How to Restore Tarnished Brass to Its Original Shine
Brass items stand out, adding glamour and charm to any room. Over time, tarnish can creep in and turn once shiny things into dull, lackluster reminders of what they used to be.

Tarnish isn’t permanent and brass can be restored to its original glory with the right techniques. Whether dealing with antiques or modern decor, knowing how to clean and polish brass can make all the difference.
With simple methods and everyday materials, you can restore the shine without damaging the metal. Let’s examine the best ways to restore the luster of tarnished brass.
1. Lemon and Baking Soda Method
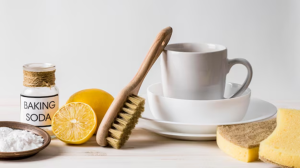
Lemons aren’t just for cocktails or sad attempts at lemonade stands. They’re also a brass-cleaning powerhouse. The citric acid in lemon juice works wonders on tarnish, and when combined with baking soda, you’ve got a DIY cleaning agent that’s both effective and oddly satisfying to use.

To start, slice a lemon in half and sprinkle a generous amount of baking soda onto the cut surface. Press the lemon directly onto the tarnished brass and rub it in small, circular motions. You’ll see a fizzy reaction that feels like a tiny science experiment—a satisfying reminder of chemical reactions in chemistry lessons.
If the brass is particularly stubborn, sprinkle additional baking soda directly onto the surface and keep scrubbing.
Once the tarnish disappears, clean the brass with a damp cloth and dry it thoroughly with a soft towel. Don’t skip the drying step unless you’re aiming for a streaky finish.
If your brass piece looks anything less than radiant, repeat the process.
2. Vinegar and Salt Scrub
Vinegar—the kitchen staple responsible for pickles and salad dressing—deserves a standing ovation for its ability to clean brass. When combined with salt, it transforms into an abrasive scrub that tackles tarnish with the determination of a toddler chasing after a dropped snack.
Create the mixture by combining equal parts of white vinegar and salt in a small bowl. Stir until it forms a paste-like consistency. Scoop some paste using a soft cloth or sponge and apply it to the tarnished brass.

Rub gently but firmly, covering the entire surface. The salt’s grittiness will help lift stubborn tarnish while the vinegar dissolves it. You might notice a less pleasant smell as you work, but it’s a small price to pay for gleaming brass.
After scrubbing, rinse the piece thoroughly with warm water to remove any residue. Pat it dry with a cloth or towel and take a moment to admire your work. The brass should be shining; if not, repeat the process until it does. Patience is important, especially when dealing with decades of tarnish.
3. Ketchup Cleaning Hack
Ketchup, the secret hero of barbecue season, has another unknown role: polishing brass. The slight acidity from the tomatoes and vinegar makes it a great tarnish remover. And let’s be honest, there’s a certain joy in slathering your brass with a condiment meant for fries.
To start, squirt a good amount of ketchup onto the tarnished areas. Spread it with your fingers or a soft cloth, covering every bit of tarnish. Let it sit for about 10 minutes. It’s a waiting game, but use the time wisely—maybe contemplate the absurdity of polishing brass with burger toppings.
Once the ketchup has cleaned your brass, wipe it off with a damp cloth. Rinse with warm water to remove all the remaining residue and dry thoroughly.
If it’s still tarnished, repeat the process or try something else. Brass restoration is never a one-size-fits-all thing, and ketchup might not be the hero your piece needs.
4. Consider Commercial Brass Cleaners
Sometimes, you need to call in the professionals—or at least their products. Commercial brass cleaners are formulated to tackle tarnish efficiently, saving you time and elbow grease. While these cleaners lack the homespun charm of lemons or ketchup, they make up for it in sheer effectiveness.
Choose a brass cleaner designed explicitly for the brass you’re restoring. Apply a small amount of the cleaner to a soft cloth and rub it onto the tarnished surface. Work in small sections, following the manufacturer’s instructions to avoid over-polishing or damaging the brass. Some cleaners may require rinsing, while others need buffing with a clean cloth.
Commercial cleaners are particularly useful for intricate brass items, such as chandeliers or ornate hardware, where tarnish likes to hide in nooks and crannies. They’re not as eco-friendly as natural methods, but when your brass piece gleams, it’s hard to complain.
5. Flour, Vinegar, and Salt Paste
For a DIY method that feels slightly like a baking project, try combining flour, vinegar, and salt to create a paste. This mixture is perfect for brass items with heavy tarnish or intricate designs that need a gentler touch.

Mix equal parts flour, white vinegar, and salt in a bowl to form a paste. Spread the paste over the brass, using your fingers or a soft cloth, ensuring it gets into every crevice. Let it sit for about 30 minutes. Use the time to reflect on how flour—an ingredient typically associated with cookies—can double as a cleaning agent.
After the paste has had time to work, rinse the brass thoroughly with warm water. Use a soft toothbrush to scrub away any remaining residue. Dry the piece with a clean towel, and apply the final polish with a microfiber cloth.
The result? Brass that practically sings with shine.
Bottom Line
Restoring tarnished brass isn’t just about bringing back its original shine; it’s about reclaiming the beauty of objects that tell a story. Whether scrubbing with lemons, smearing on ketchup, or wielding a commercial cleaner, the satisfaction of seeing tarnish fade is undeniable.
Brass doesn’t demand perfection, just effort. And as you step back to admire your work, remember: a little polish—literal and metaphorical—goes a long way. So go ahead, bring out the shine. The brass deserves it. And honestly, so do you.


